Description
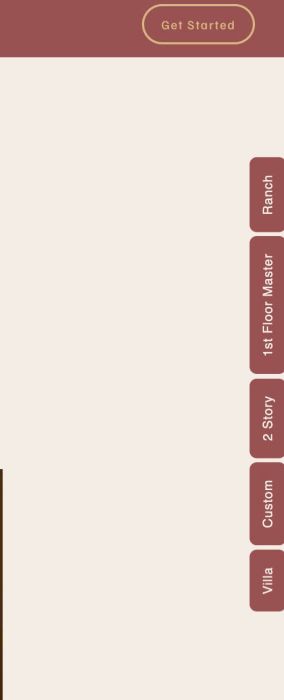
- floating menu on right side of page
- view demo – password: abc
- buy me a coffee
#1. Install Code
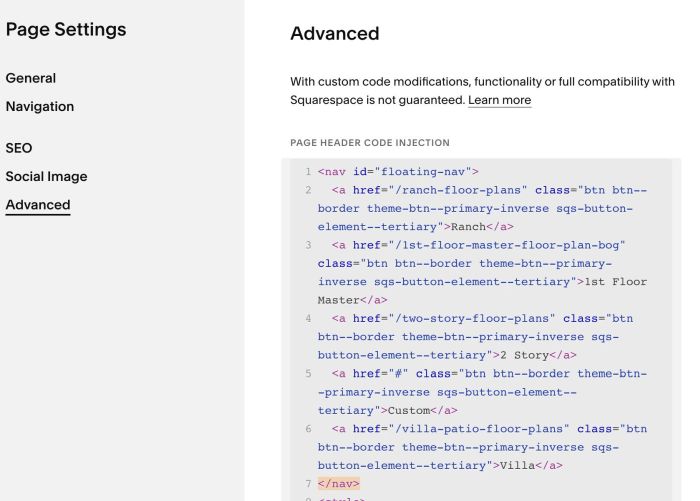
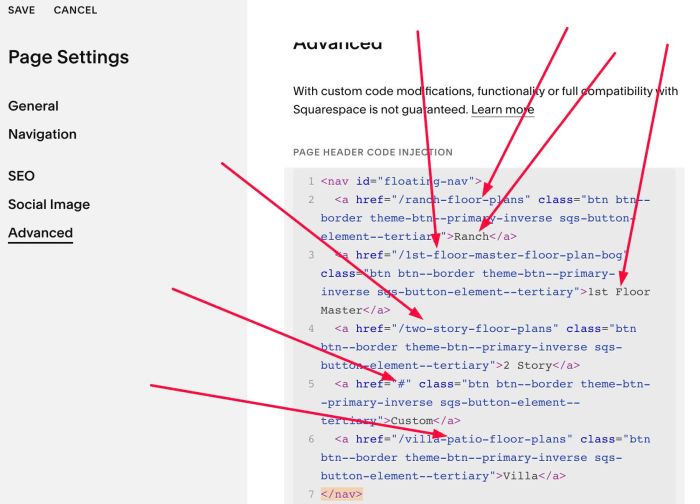
#1.1. Hover on Page where you want to make it appears > Click Gear icon
Click Advanced > Paste this code
<nav id="floating-nav">
  <a href="/ranch-floor-plans" class="btn btn--border theme-btn--primary-inverse sqs-button-element--tertiary">Ranch</a>
  <a href="/1st-floor-master-floor-plan-bog" class="btn btn--border theme-btn--primary-inverse sqs-button-element--tertiary">1st Floor Master</a>
  <a href="/two-story-floor-plans" class="btn btn--border theme-btn--primary-inverse sqs-button-element--tertiary">2 Story</a>
  <a href="#" class="btn btn--border theme-btn--primary-inverse sqs-button-element--tertiary">Custom</a>
  <a href="/villa-patio-floor-plans" class="btn btn--border theme-btn--primary-inverse sqs-button-element--tertiary">Villa</a>
</nav>
<style>
  #floating-nav {
    position: fixed;
    right: 0;
    top: 50%;
    transform: translateY(-50%);
    z-index: 9999;
    display: flex;
    flex-direction: column;
    gap: 4px;
  }

  #floating-nav a {
    display: block;
    writing-mode: vertical-rl;
    text-orientation: mixed;
    transform: rotate(180deg);
    padding: 16px 10px;
    font-size: 12px;
    letter-spacing: 0.05em;
    white-space: nowrap;
    text-decoration: none;
  }
</style>
#1.2. To adjust size, space… you can adjust these lines.
padding: 16px 10px;
font-size: 12px;
letter-spacing: 0.05em;
to adjust space between items, change this line
gap: 4px;
#1.3. To update Text/URL, change these.
#2. Customize
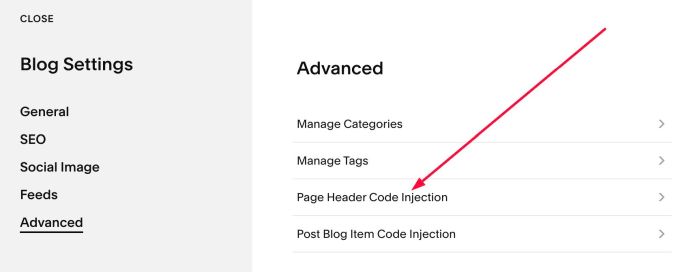
#2.1. To make it appears on both (Blog Overview Page + Blog Posts), you can add it to Blog Page Header Injection
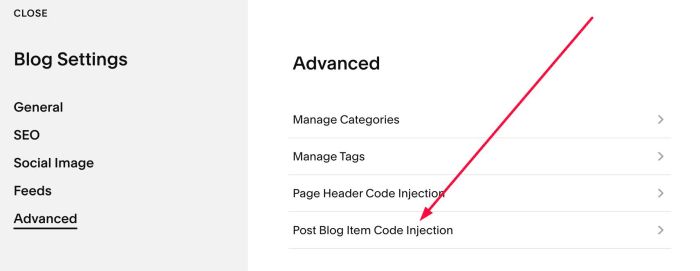
#2.2. To make it appears on Blog Post only (doesn’t appear on Blog Overview page), add it to Post Blog Item Code Injection
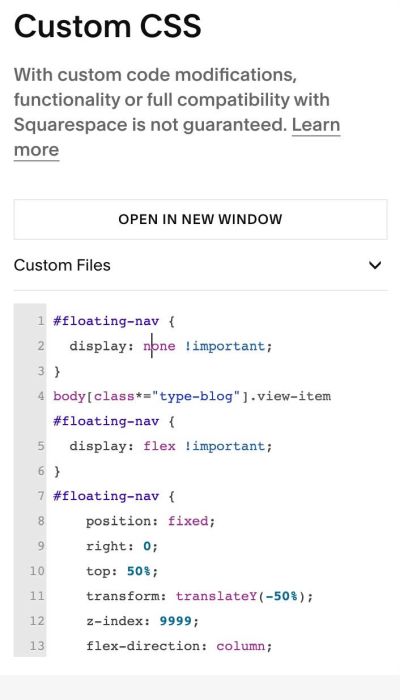
#2.3. If you want to make it appears on all blog posts, use this code to Code Injection > Footer
<nav id="floating-nav">
  <a href="/ranch-floor-plans" class="btn btn--border theme-btn--primary-inverse sqs-button-element--tertiary">Ranch</a>
  <a href="/1st-floor-master-floor-plan-bog" class="btn btn--border theme-btn--primary-inverse sqs-button-element--tertiary">1st Floor Master</a>
  <a href="/two-story-floor-plans" class="btn btn--border theme-btn--primary-inverse sqs-button-element--tertiary">2 Story</a>
  <a href="#" class="btn btn--border theme-btn--primary-inverse sqs-button-element--tertiary">Custom</a>
  <a href="/villa-patio-floor-plans" class="btn btn--border theme-btn--primary-inverse sqs-button-element--tertiary">Villa</a>
</nav>
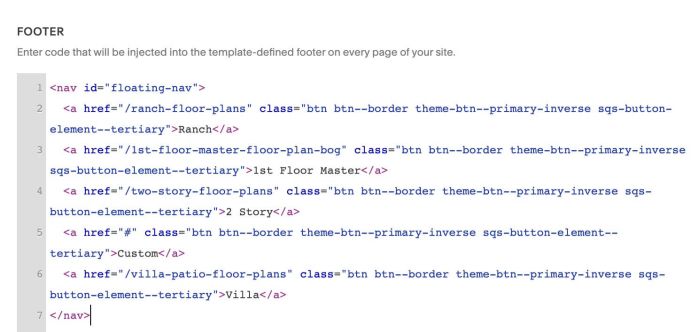
and this code to Custom CSS
#floating-nav {
  display: none !important;
}
body[class*="type-blog"].view-item #floating-nav {
  display: flex !important;
}
#floating-nav {
    position: fixed;
    right: 0;
    top: 50%;
    transform: translateY(-50%);
    z-index: 9999;
    flex-direction: column;
    gap: 4px;
  }
  #floating-nav a {
    display: block;
    writing-mode: vertical-rl;
    text-orientation: mixed;
    transform: rotate(180deg);
    padding: 16px 10px;
    font-size: 12px;
    letter-spacing: 0.05em;
    white-space: nowrap;
    text-decoration: none;
  }